Showing posts with label DIY. Show all posts

Sunday, March 25, 2012

Guest Post Sunday - My Latest Obsession


Meet Sam from
::::::::::::::::::::::::::::::::::::::::::::::

Hello, hello! This is Sam here from My Latest Obsession. Today, I wanted to share a tutorial with you guys on how to spice up that regular ol' t-shirt by sewing on a pretty lace collar! It's super easy and perfect for any beginner! 


1. I started off with a collar I already had but if you don't have one, simply grab a piece of paper, trace around the neckline of the shirt and draw yourself one! This also allows you to customize it a bit. For example, instead of a rounded corner, you may want more of a square corner! Get creative! 

2. Cut out the lace collar. I chose not to do a piece for the back but that's completely up to you. 

3. Pin collar onto shirt and sew along the edges (preferably with a smaller stitch since it's lace). 

Style and enjoy! 

-Sam 

Sunday, February 26, 2012

GUEST POST SUNDAY - Wear The Canvas


Meet Jené
from

The adorable lady behind a lovely BLOG & SHOP

:::::::::::::::::::::::::::::::::::::::::::::::::::::::::::::::::


These pretty paper covered magnets are such a fun and easy craft, which actually serve to be very useful in the end. You can use these to add a charming little touch to your fridge, and they're even cute enough to give away as favors or swag. 

Supplies:
-Magnets
-Card stock
-Pencil
-Scissors
-Paintbrush
-Modge Podge 


1. Trace around your magnet on to the wrong side of your patterned card stock. Slowly cut around the outside of the circle you traced. Make sure to use a lot of tiny cuts instead of a couple of long ones. 

2. paint a tiny bit of Modge Podge on to your magnet. 

3. Stick your paper circle on top of the magnet. Wait for the glue to dry, and then cut any excess paper off the edges to form a perfect circle. 

4. Add a thin top coat of Modge Podge to your paper magnets. Wait for them to dry before using. 

Sunday, February 19, 2012

Guest Post Sunday - Life Unscripted

G U E S T  P O S T  S U N D A Y


Meet Amber from life..unscripted 

Amber has a lovely blog full of DIY's, recipes & everyday life! She's in the process of planning her wedding & just recently had the most adorable engagement photos ever taken!


:::::::::::::::::::::::::::::::::::::::::::::::::::::::::::::::::


hello lovely threadesque readers! my name is amber and i blog over at life...unscripted. over there you will find snip-its of my life, wedding planning, tutorials, and recipes. i love meeting new people so don't be shy! thank you Sam for having me i am so glad to be here today and share a fun, simple tutorial!

it works perfectly for valentines but can be used all year round!
i am loving the chalkboard trend right now and i am jumping on that train.

today i am sharing a cute chalkboard for leaving love notes.

so here we go!
{1}
{2}{3}
i am horrible at waiting for things to dry...
i need to start a new project otherwise i will just keep painting
{4}
you could add rosettes, ribbon, do some decorative painting, or what ever else.
it's kinda like a blank canvas.

hope you enjoyed this simple, fun tutorial!

Pin It

Thursday, February 16, 2012

Giveaway - The Owl Club - WINNER


 Thank you so much for all of your entries in the lovely Owl Club giveaway!

And the winner is.........


Congratulions Tia!

Sunday, February 12, 2012

GUEST POST SUNDAY- Scarlet Begonia VIntage

Meet Jess from 


Jess is the adorable lady behind an amazing vintage shop & lifestyle blog! She has great style and I can't help but to read her blog posts over & over!


:::::::::::::::::::::::::::::::::::::::::::::::::::::::::::::::::


Hello and Happy Valentine's Day Threadesque readers! My name is Jess and my blog is called Scarlet Begonia Vintage. Today I want to show you how to make a lovely Valentine's display out of an old window frame. I love this project because you can get as creative as you want with it (might I suggest this cute idea). 


Step 1- Gather your supplies. You will need the following items for this DIY:
  • Window Frame 
  • Lace
  • Scissors
  • Staple Gun
  • Glue
  • Small Clothes Pins
  • Cotton Swabs
  • Glitter
  • Valentines, Photos, Other Decorative Items to Hang


Step 2-  Position lace where you want it on the frame (you may want to tape it in place, so that it doesn't move during the next step).


Step 3- Flip the window over and securely staple the lace in place on the back of the frame, making sure to keep the lace nice and taught while you are stapling.


Step 4- To glitter, spread glue with cotton swab to the top part of the clothes pin and dip into the glitter. This is best done on a plate to contain your mess. Allow the clothes pins to dry for at least 1 hour before use.


Step 5-  Arrange Valentines, photos, and any other decorations you would like to hang.

-Jess

Sunday, February 5, 2012

GUEST POST SUNDAY - The Owl Club


GUEST POST SUNDAY

Meet Suki


The lovely lady behind The Owl Club, 
 BLOG & SHOP


:::::::::::::::::::::::::::::::::::::::::::


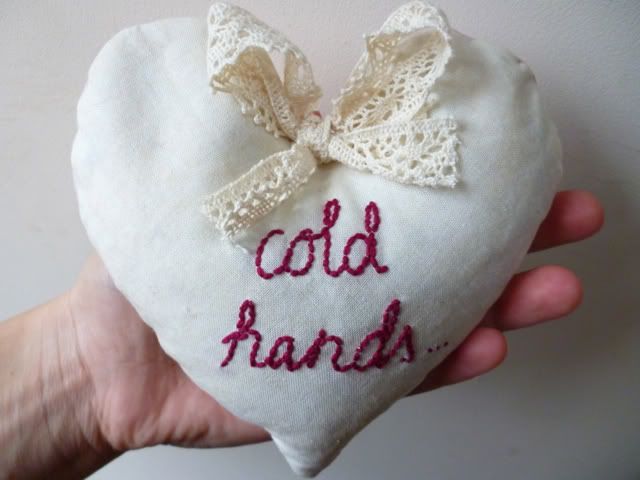
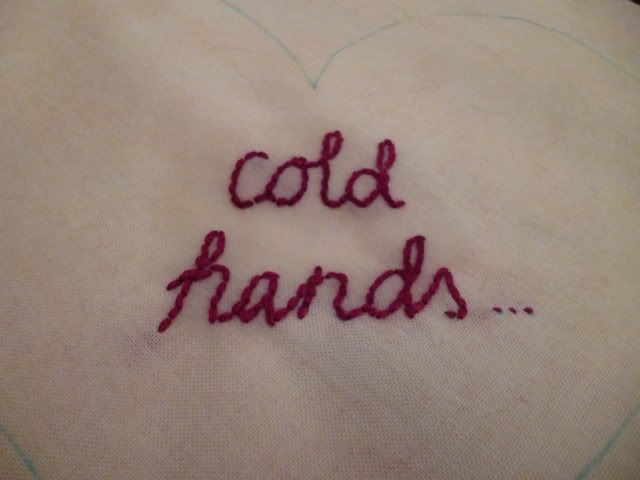
You know that saying, "cold hands, warm heart"? Well this is a sweet, easy project that takes the expression literally and makes a warming, scented heart to heat up those cold mitts. It makes a perfect present for Valentines with hearts aflame but freezing fingers!


The handwarmer is made with pretty embroidered cotton and snuggly jersey. It is filled with dry rice and a sprinkling of lavender. You just pop it in the microwave for 2-3 minutes on medium and it will keep your hands snug for hours, as well as exuding a calming fragrance.


Here's what you need:


  • cotton fabric (you could use an old pillow case)
  • cotton jersey (you could use an old t-shirt)
  • embroidery hoop, thread and needle
  • sewing machine and thread (or you could do it by hand, why not?!)
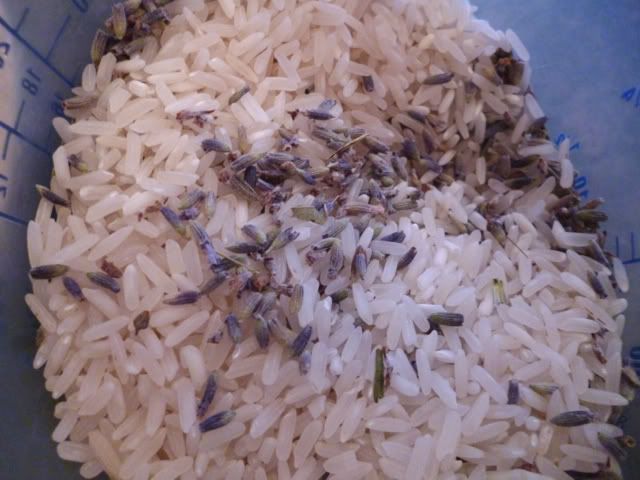
  • about 275g rice
  • a handful of dried lavender (optional)
  • lace trim or ribbon
  • water soluble pen or tailor's chalk
  • steam iron
  • chopstick


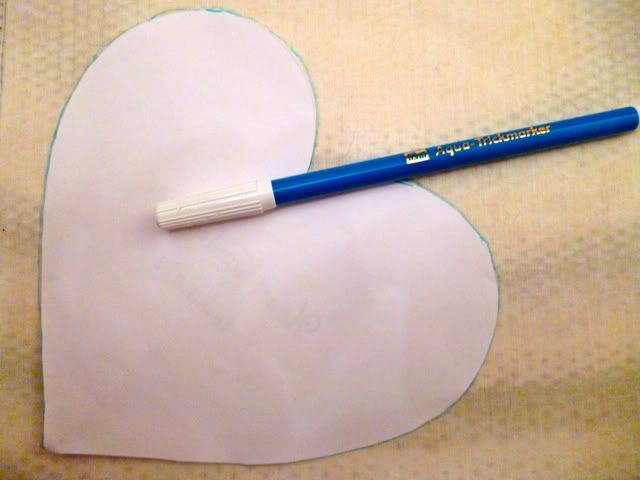
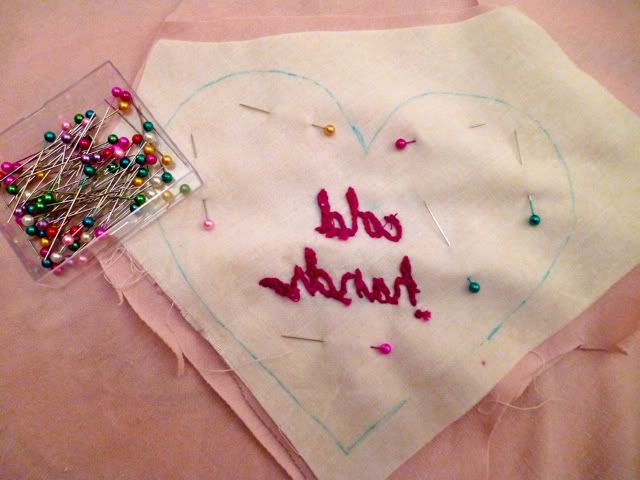
First you'll need to draw round your template (download mine here) on the wrong side of the cotton fabric using chalk or a water-soluble pen. You should be able to see the outline on the right side, to help place your embroidery. (n.b. I used a linen-look cotton here but you could use prints - anything goes!)


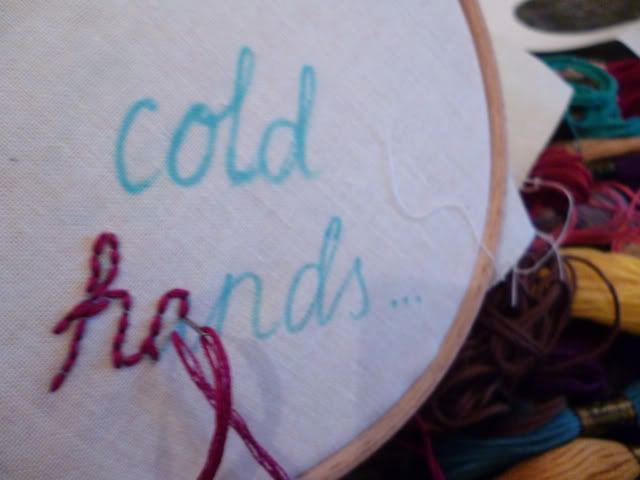
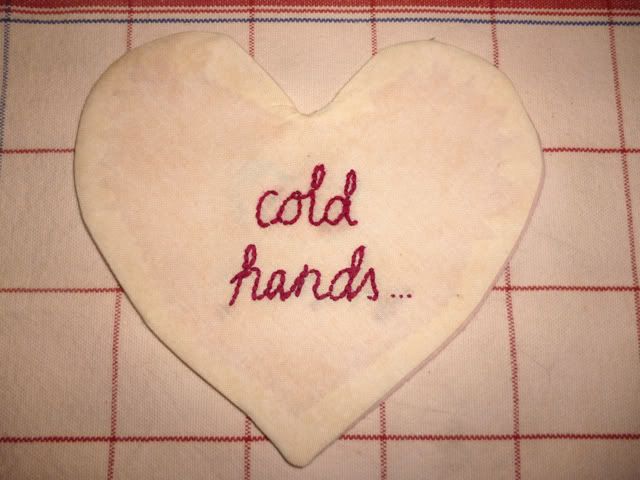
In the centre of your heart shape, draw on your message (it could also just be "I love you"!) Stretch the fabric in an embroidery hoop and use a small back stitch (or any fancy stitch you like!) to create the lettering. I wanted a handwritten look with plenty of texture, so I used all 6 strands of my embroidery floss.


So then you'll have something like this! Make sure you wash off any traces of the original pen lettering at this stage.


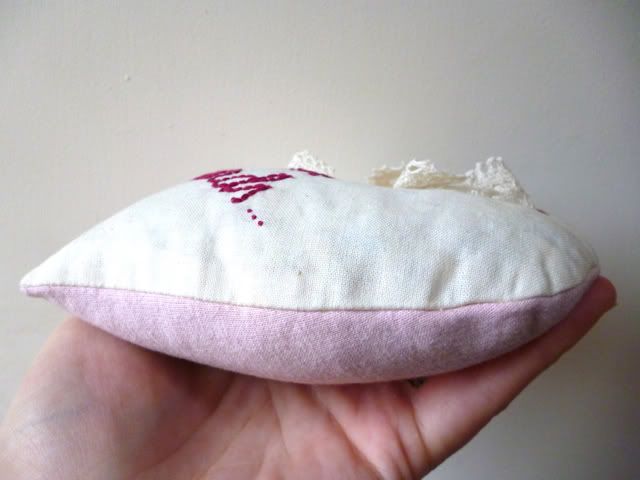
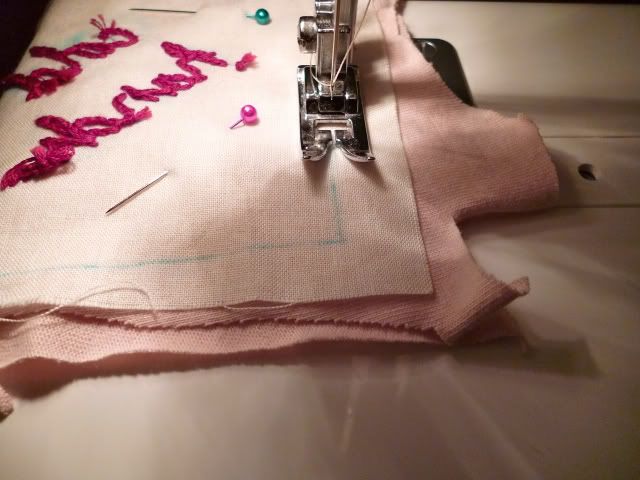
Cut roughly round the heart shape and pin to 2 layers of cotton jersey before cutting out, leaving plenty of margin at the edges (because jersey can shift around a bit). Make sure the middle piece of jersey has its right side facing the right side of the cotton before you sew!


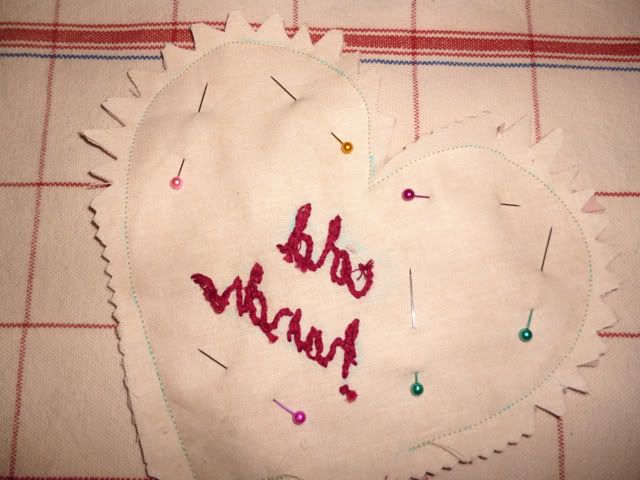
Then sew around the heart shape, using a small stitch width to go smoothly round the curves. Make sure your needle is down in the fabric when you turn the foot to go round the points. Also make sure you leave a small gap (about 2.5cm/1.5inch) for turning out. The picture above indicates a good place to start sewing so that you have a gap along the straight edge (easier for sewing up afterwards).


Trim off the edges neatly and notch around the curves so that it will turn out with as smooth a curve as possible. Hey, you're nearly there!


Then turn it out, using a chopstick to get into the points (and the flat end of the chopstick is great for going round the curves!) Give it a good press with a steam iron to neaten it all up.


Put the rice in a container and mix through a handful of dried lavender buds. Mmm, smells good, bet you're feeling all calm now? Good, because this is the fiddly bit: using a spoon and funnel, or just a teaspoon, fill the heart until it is fairly full but still squidgy to the touch. Tip: place a bowl under the the heart as you fill it to catch any stray grains of rice!


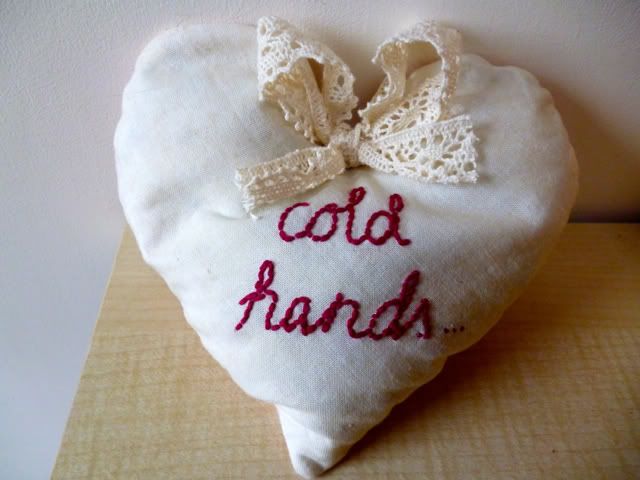
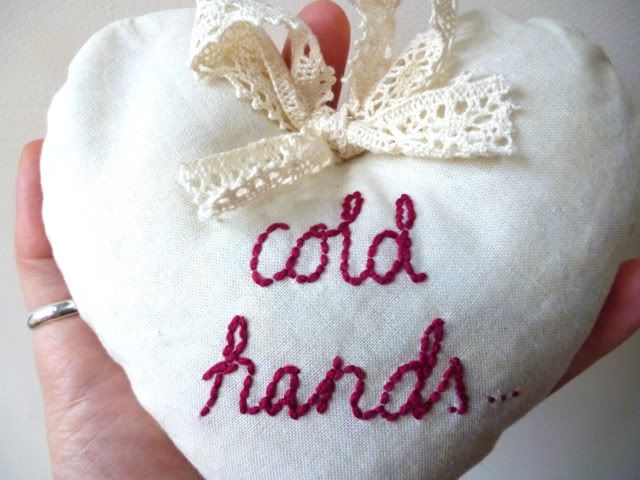
Then sew up the opening using an invisible ladder stitch. To prettify, sew on a bow made with lace trim or ribbon... and you're done! You could also make a little label with instructions on how to heat the handwarmer. I like a brown paper tag with a little matching lace and a button glued on.


And there you have it: a pretty heart-shaped handwarmer, for your Valentine, or just for someone suffering from the cold February weather! Have fun making them!


Suki xo


p.s. you can see where I found my inspiration for this project here.

Sunday, January 29, 2012

DIY Map Valentine


I love making my fiance, Donovan sweet handmade cards all the time but for Valentine's Day I always do something extra special! We love to travel together so I decided to make him a map valentine that could also be used as art around our house! 


You will need..

-A map
-Glitter
-Pencil
-Scissors 
-Glitter glue


Step 1: Draw a heart shape on the back of your map 

Step 2: Cut along the line

Step 3: Write the letters on the map using your glitter glue

Step 4: Glitter! Shake off excess glitter


Step 5: Give to your loved one on Valentine's Day!


Sunday, January 8, 2012

GUEST POST SUNDAY - Off Street Studio


GUEST POST SUNDAY

Meet Pam
from


I'm excited for you all to see the beautiful work this talented lady creates. She makes amazing jewelry (I own a few beautiful pieces and love them)! She's sharing a lovely furniture DIY.

ENJOY!


" I see art in the discarded, recycle furniture as well as ideas, weld steel that I can't move without a crane and constantly create with a sliver of humor and a cup of caramel iced coffee. At nine, I discovered mulberries made a perfect watercolor red and realized maybe, just maybe, it's ok to paint outside the lines"


Repurposing or refinishing pieces to create your own functional art requires a must-have tool.  A tool that has sent you on missions beyond the stars, built your fortress of sheets draped over the dining room table and turned Mom’s garden into a tropical timeshare vacation for Barbie and Ken.  That tool, of course, is your imagination.  
So pack your imagination and start looking around you.  There are so many places to find a find; at the curb on trash day, in the attic, under rotted boards in a barn, the bowels of your basement or “For Sale Free” online.
I acquired my antique bench from the previous owner of my first home.  The 80-something year-old woman insisted the solid maple bench was from a bowling alley way-back-when.  I loved this piece for nearly 15 years, but rarely used it.  Until now…
As charming as the bench was, it wasn’t comfortable to sit on and dwarfed my 1960’s daybeds. It deserved to get more use and I needed a console for my TV.  
This project was surprisingly easy.  I grabbed my Milwaukee Sawzall or reciprocating saw (similar to an electric bread knife to us bakers) and “sliced” through the arms and back of the bench.  You can pay up to $200 for a saw, but check your local equipment rent-all company to see if they will sell a used one for about $40.
TOOLS

The next step is to remove the undesirable dark stain.  I like Zip Strip.  It aggressively removes stain and paint finishes.  Just make sure you use it in a ventilated area and wear protective glasses/gloves because it is highly toxic.  Ideally, make your workspace your garage, a shed or even outside. 

I used my belt sander to remove any remaining stain that had soaked into the wood.  To achieve a blonde color to complement my living room furniture, I moved my project to full sun and applied bleach to the wood.  This is an effective way to lighten wood, but it raises the grain, so final fine and extra fine sanding is necessary.  For a fresh finish, I brushed the console with several coats of satin polyurethane.

Repurposed and relevant!  The old wood bench is still an antique.  It just has more history and stories; boasting a modern style.  

For additional tips, go HERE!


Check out Off Street Studio on

Related Posts Plugin for WordPress, Blogger...